Building an outdoor kitchen doesn’t require a five-figure investment. With smart planning and some sweat equity, homeowners can create a functional, stylish cooking space for a fraction of what contractors charge. The key is prioritizing essentials, sourcing salvage materials, and handling the work yourself. This guide walks through seven proven strategies to build outdoor kitchen ideas on a budget, from choosing the right grill to DIY countertops, so you can host backyard dinners without draining your bank account.
Table of Contents
ToggleKey Takeaways
- Prioritize a freestanding grill ($300–$800) and functional counter space as the foundation for outdoor kitchen ideas on a budget, skipping expensive built-in masonry installations.
- Salvage yards and online marketplaces offer materials like reclaimed wood, cast-iron sinks, and granite at 50–70% discounts compared to new materials.
- DIY concrete countertops or outdoor tile can cost $150–$300 in materials versus $1,500+ for professional installation, saving thousands on a budget kitchen.
- Build storage solutions using pressure-treated lumber and repurposed furniture like old dressers or plastic boxes to keep costs between $30–$150.
- Plan your layout strategically by sketching prep, cook, serve, and cleanup zones before building to maximize functionality and avoid costly mistakes.
- A complete DIY outdoor kitchen can be built for $1,500–$3,000 instead of $10,000+ by combining smart planning, salvage materials, and hands-on work.
Start With The Essentials: Grill and Counter Space
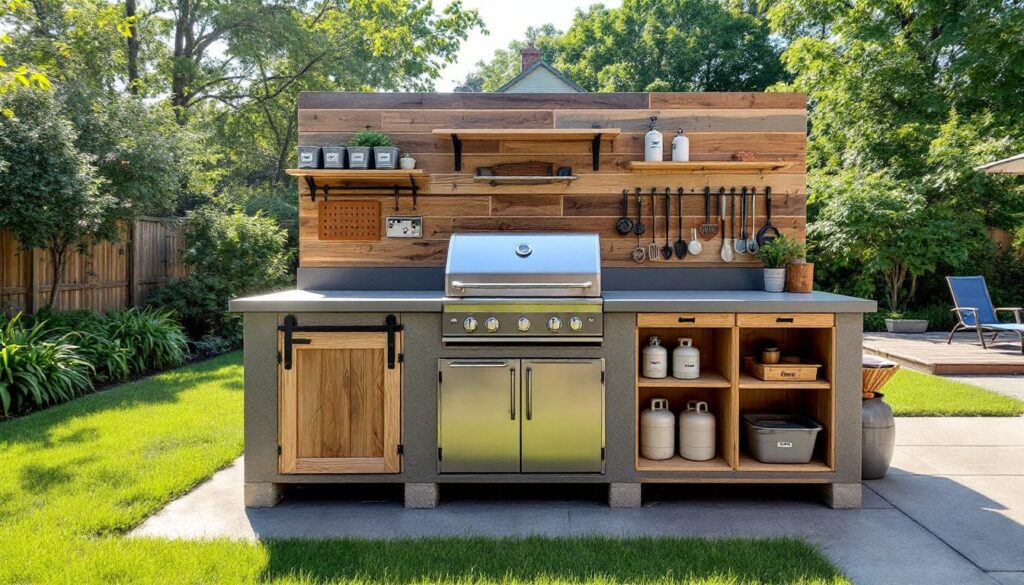
Before picking a tile pattern or stainless steel sink, nail down the backbone: a grill and enough counter space to prep food. Skip the built-in grill initially. A freestanding propane or charcoal grill costs $300–$800 and sits on a frame you build yourself using pressure-treated lumber and concrete blocks. This setup saves thousands compared to a masonry surround.
Counter space matters more than luxury finishes. A 4×8 section of exterior-grade plywood (1-inch nominal thickness, around $50–$75) mounted on a frame gives you prep room and storage underneath. You’ll reinforce it with a concrete overlay later, or leave it as-is and finish with deck stain and polyurethane for now. A grill, counter, and basic overhead protection cover 80% of what an outdoor kitchen needs to function.
Think of these two items as your foundation. Everything else builds around them. A DIY outdoor kitchen station can start with just these elements before adding sinks, storage, or built-in coolers.
Upcycle and Repurpose Materials for Maximum Savings
Salvage yards, estate sales, and online marketplaces are goldmines for outdoor kitchen parts. Old filing cabinets, barn doors, cast-iron sinks, and granite slabs cost 50–70% less than new ones and carry character new materials can’t match.
Pallets, Reclaimed Wood, and Salvage Finds
Wood pallets are the DIYer’s secret weapon. They’re often free or $5–$10 each from businesses that’d otherwise landfill them. Stack and secure them with exterior wood screws to create a side cabinet, a slat-back design for mounting hooks, or even the frame for a serving counter. Sand them smooth, apply exterior wood stain and sealant, and they age beautifully.
Reclaimed barn wood and fence boards add authentic texture to backsplashes or siding. Check local salvage yards, prices run $2–$6 per linear foot, versus $10–$20 for new treated lumber. Old galvanized troughs work as ice buckets or herb planters. Cast iron grates, grilling surfaces, and even vintage farm tools become decor that doubles as function.
When sourcing salvage, inspect wood for rot, pest damage, and, if you’re using it for food prep, make sure it’s safe. Avoid treated wood from unknown sources that may contain arsenic. For structural or food-contact surfaces, new pressure-treated lumber ($1–$3 per foot) is the safer bet. Salvage works best for siding, decorative frames, and shelving.
DIY Concrete Countertops and Budget Countertop Alternatives
Concrete countertops look polished and last decades, yet they’re affordable to pour yourself. A 4×8 section costs $150–$300 in materials (concrete mix, rebar, forms, sealer) versus $1,500+ installed by a pro. The process takes a weekend: build a plywood form, lay down rebar for strength, pour concrete, finish the surface, cure for 7 days, seal it.
If concrete feels intimidating, tile over your plywood base. Outdoor-rated ceramic or porcelain tile runs $2–$8 per square foot. Lay it with outdoor-grade thin-set mortar and epoxy grout (which resists moisture better than standard grout). A 4×8 counter costs $150–$250 in materials and takes a long weekend to install. Seal the grout with an outdoor sealer, this step matters for freeze-thaw climates.
Another budget option: polished concrete slabs salvaged from driveways or patios (often free or cheap). Set them on your frame, grout the seams, and seal. They’re weather-worn, not fancy, but functional and authentic.
For the most budget-conscious route, exterior-grade plywood with a marine epoxy top coat ($40–$60) works fine for prep surfaces. It won’t last as long as concrete or tile, but it buys time while you save for upgrades. resurface every 3–5 years with fresh epoxy or move to tile when budget allows.
Smart Storage Solutions Without Breaking the Bank
Storage in an outdoor kitchen prevents clutter and protects tools from weather. Build it yourself with pressure-treated lumber and exterior plywood. A 2×4 frame with 3/4-inch plywood sides, a hinged door, and exterior stain runs $80–$150 and stores grilling tools, propane canisters, and cooking supplies.
Use the space under your counter for shelves or open cubbies. Mount 1×10 boards on 2×4 studs to create two or three shelves. Add labels and weatherproof plastic bins to organize and protect items. Alternatively, hang pegboards on a wall or fence, they cost $20–$40 and hold hooks, clips, and small tools.
For a sink or cooler, repurposed furniture works well. An old dresser with the top cut out and a basin dropped in becomes a charming prep sink. A plastic outdoor storage box becomes a beer cooler when lined with a trash bag and filled with ice. These hacks cost $30–$60 versus $300+ for built-in options.
Don’t forget a towel rack (a cheap metal rod mounted on studs) and a small shelf for spices, condiments, and cooking sprays. These touches make your space feel complete and functional.
Strategic Layout Planning to Maximize Function
A poorly laid-out kitchen wastes space and frustrates every cookout. Before you build, sketch your zone: prep, cook, serve, and cleanup. Arrange them in a logical flow so traffic doesn’t jam and heat from the grill stays away from food prep and guests.
Place your grill first, it’s the anchor. Position it where smoke drifts away from seating areas (consider prevailing winds). Build counter space to one or both sides so you have room for raw ingredients on one side and a landing spot for cooked food on the other. This 18–24-inch gap beside the grill is worth the extra wood and concrete.
A covered <a href="https://hearthrootsvictory.com/outdoor-living-room-set/”>outdoor living room set positioned near, but not too near, the kitchen creates a natural gathering spot. Store dirty tools and propane away from seating. If your space is tight, a grill on a cart with a folding counter table nearby works fine and saves building permanent structures.
Measure your space before cutting lumber. Mark out zones with rope or chalk. Walk through the workflow: moving from fridge to prep counter to grill to serving area. Are doorways and gates in the way? Does the hose reach? Spending an hour on layout saves days of regrets. A 12×14-foot space handles a modest kitchen well: smaller areas need smarter, vertical storage and compact appliances.
Conclusion
Building a budget outdoor kitchen boils down to priorities: nail the grill and counter space, source salvage materials, DIY the finishing details, and plan a layout that works. You’ll have a functional outdoor living space for $1,500–$3,000 instead of $10,000+. Start small, add upgrades as budget allows, and enjoy the satisfaction of cooking and gathering in a space you built yourself.