
Your home’s exterior walls are a blank canvas waiting for transformation. Whether you’re looking to boost curb appeal, create a cozy retreat, or turn your outdoor space into an entertainment hub, exterior wall decor sets the tone for your entire backyard experience. From living walls that breathe life into concrete to statement lighting and textured finishes, the possibilities for 2026 are more exciting than ever. This guide walks you through ten proven ideas, all practical enough for DIYers yet polished enough to impress. Let’s start upgrading those walls.
Table of Contents
ToggleKey Takeaways
- Exterior outdoor wall decor ideas like vertical gardens and painted accent walls instantly transform your home’s curb appeal with minimal investment and DIY-friendly installation.
- Living wall systems improve air quality and reduce heat absorption while requiring only 1–2 hours of monthly maintenance once established.
- Metal sculptures, textured finishes like shiplap, and strategic lighting fixtures serve dual purposes as both design statements and functional elements for outdoor entertaining.
- Proper installation with corrosion-resistant fasteners and thorough wall prep—including pressure-washing and priming—ensures exterior wall improvements last for years without peeling or deterioration.
- Climbing vines paired with trellises soften architectural lines and create dramatic shade patterns, with fast-growing varieties like clematis reaching 10–20 feet within just a few seasons.
- Outdoor wall decor planning should integrate complementary materials and finishes, such as pairing sculptures with vines or coordinating lighting with textured cladding for a cohesive outdoor living experience.
Vertical Garden Walls
Living Wall Systems And Green Solutions
Vertical gardens transform blank walls into living art while improving air quality and reducing heat absorption. A living wall, also called a green wall or living wall system, uses modular panels, pocket planters, or trellis-mounted containers to grow plants vertically up your exterior surface. The effect is dramatic: instant greenery, no ground space needed, and a natural cooling effect during hot months.
Installation basics: Most living wall systems attach to existing walls with brackets or mounting rails. Check your wall’s condition first, living walls add weight, so ensure your substrate (wood, concrete, or vinyl siding) is solid. Pre-drilled pilot holes prevent cracking: use corrosion-resistant fasteners rated for outdoor use. A drip irrigation line running along the top keeps plants watered without daily hand-watering, which is crucial for success.
Plant selection matters. Choose drought-tolerant varieties like sedums, ornamental grasses, or trailing ivy for low-maintenance systems. In humid climates, creeping fig or clematis vines work beautifully. Avoid heavy fruiting plants that attract pests, stick to foliage and flowering specimens that weigh less and require minimal pruning.
Maintenance: Water systems need occasional cleaning to prevent clogs. Trim back aggressive growers monthly during the growing season. In winter, ensure drainage stays clear so standing water doesn’t freeze and damage the system. Budget 1–2 hours monthly for upkeep once established.
Painted Accent Walls
A fresh coat of paint is the quickest, most affordable way to redefine an outdoor wall. Bold colors, deep forest green, warm terracotta, moody charcoal, create instant personality without very costly. An accent wall (painting just one section) draws the eye and adds architectural interest without overwhelming the space.
Prep is everything. Pressure-wash the wall first to remove dirt, algae, and loose paint. Let it dry fully (24–48 hours), then sand any rough spots lightly with 120-grit sandpaper and fill cracks with an exterior-grade filler. Skip this, and paint will peel within months. Apply a primer formulated for exterior masonry or wood, not all primers are equal outdoors.
Product selection: Use exterior-grade paint rated for your climate zone. Acrylic latex paints resist UV fading better than oils and clean up with water. Expect to use about 350–400 square feet per gallon on smooth surfaces: rough surfaces consume more. Semigloss or satin finishes hide imperfections better than flat and resist mildew in damp climates.
Application: Paint in cooler morning or evening hours (below 85°F is ideal) to prevent lap marks. Use a 4-inch brush for detail work and a roller with a 3/8-inch nap for flat sections. Two coats typically provide full coverage and longevity. Your entire exterior wall renovation can complement other outdoor improvements that tie the space together.
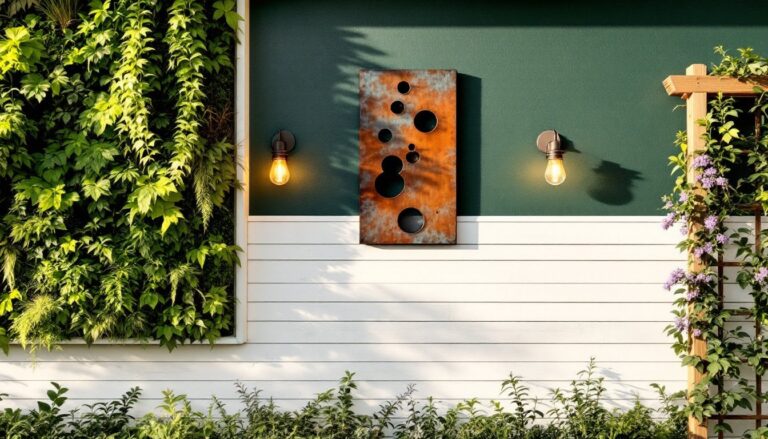
Outdoor Wall Art And Metal Sculptures
Metal art, wood carvings, and sculptural installations transform walls into gallery-worthy focal points. Think weathered metal flowers, abstract geometric shapes, or repurposed industrial pieces. The right wall sculpture catches light and shadow, creating depth and intrigue.
Installation requirements: Heavy pieces demand proper anchoring. Use stainless steel or galvanized bolts and brackets rated for outdoor use, rust will stain your walls and weaken fasteners. For masonry, install a concrete anchor or toggle bolt: for wood siding, lag bolts into structural framing work best. Never rely on nails alone for anything heavier than 10 pounds.
Material durability: Wrought iron, corten steel (a weathering steel that ages beautifully), and powder-coated aluminum resist the elements. Avoid untreated mild steel unless you want fast rust (sometimes intentional for aesthetic). Wood art requires annual sealing with exterior-grade polyurethane or furniture wax to prevent rot and weathering.
Placement strategy: Group odd numbers of sculptures (three, five, seven) for visual balance. Vary heights and orientations to create rhythm. Light-colored walls showcase dark sculptures: dark walls need lighter pieces. Allow several inches of clearance from adjacent surfaces to prevent moisture trapping and mold growth. Sculptural elements work especially well when paired with climbing vines or trellises that add movement and natural texture.
Lighting Fixtures As Decorative Elements
Strategic lighting serves double duty: it illuminates your space after dark and becomes a design statement during the day. Wall-mounted lanterns, string lights, uplights, and recessed fixtures add ambiance and extend your outdoor entertaining hours well into evening.
Fixture types and function: Traditional sconces flank a doorway or line a wall for symmetrical, elegant lighting. String lights (Edison bulbs, bistro-style) create casual charm perfect for patios and deck areas. Uplighting mounted low on the ground washes walls with dramatic shadow and texture. Recessed fixtures nestle into soffit or trim for clean, modern integration. Each serves a purpose beyond aesthetics, they improve safety, security, and usability.
Electrical safety: Outdoor lighting must meet NEC (National Electrical Code) requirements for wet locations. All fixtures need GFCI (ground-fault circuit interrupter) protection: many come built-in, or use a GFCI outlet. Buried wire runs need conduit protection and proper depth (typically 18 inches for low-voltage, 24 inches for standard voltage). Hire a licensed electrician for hardwired installations, this isn’t a DIY job if you’re uncertain about local codes.
Low-voltage alternatives: Solar-powered and low-voltage LED systems avoid electrical work. They’re simpler to install but offer less brightness. Battery-powered fixtures fade in output over time. Quality matters here, cheap solar lights often underwhelm. Professional outdoor living setups often incorporate carefully planned lighting to maximize functionality and beauty year-round.
Shiplap, Cladding, And Textured Finishes
Textured wall treatments add dimension and visual interest while protecting underlying surfaces from weather. Shiplap (overlapped horizontal boards), metal or fiber-cement cladding, and stucco finishes are durable and distinctive.
Shiplap installation: Shiplap boards (commonly 3/4 inch thick, 5–7 inches wide) overlap slightly to shed water. Install horizontal runs from bottom to top, working with the tongue-and-groove profile. Use corrosion-resistant fasteners (stainless or hot-galvanized) and drive them below the overlap line so water sheds past them. Space fasteners 16–24 inches apart and pre-drill to prevent splitting. Finish with exterior-grade stain or paint to prevent weathering and graying.
Fiber-cement and metal cladding: These engineered products offer durability without wood’s maintenance demands. Fiber-cement (brands like HardiePlank) resists rot, insects, and fire, ideal for high-moisture areas. Metal cladding (corrugated or standing-seam steel) has an industrial vibe and requires no finish. Both need proper substrate preparation and flashing to prevent water behind the panels.
Stucco and textured finishes: Stucco creates a monolithic, seamless look and handles temperature swings well. Application is specialized, hire a pro unless you’re experienced. Textured coatings (knockdown, popcorn-style finishes applied over existing walls) add depth without tearing out old siding. They hide imperfections but trap dirt: plan for occasional pressure washing. Wall textures integrate beautifully when your outdoor living room includes complementary materials and finishes.
Trellises, Pergolas, And Climbing Vines
Trellises and pergolas provide structure for climbing plants and cast dramatic shade patterns while softening hard architectural lines. Unlike a pergola (an open-roof overhead structure), a trellis is primarily a wall-mounted or standing frame for vines.
Trellis selection and placement: Wood trellises (cedar or pressure-treated pine) are affordable and easy to customize: metal (steel or aluminum) lasts longer but costs more. A trellis mounted 3–6 inches from the wall allows air circulation behind climbing plants, preventing rot and pest harboring. Ensure fasteners penetrate solid framing, sheathing alone won’t hold vines’ weight long-term. Use lag bolts into studs or masonry anchors for concrete.
Vine selection: Fast-growing climbers like clematis, climbing hydrangea, or trumpet vine reach 10–20 feet in a few seasons. Ivy covers ground quickly but requires aggressive pruning. Flowering varieties (clematis, jasmine, honeysuckle) add color and fragrance. Slow-growing heirloom varieties mature over years but offer elegance and disease resistance. Check your USDA hardiness zone to ensure vines survive winter.
Maintenance: Prune vines annually after flowering to prevent tangling and mold in dense growth. Tie loose shoots to the trellis with soft twine or plant clips, wire cuts into stems. Water newly planted vines deeply once weekly until established (about one year). Mature vines typically rely on rainfall but benefit from irrigation during droughts. Strategic trellising pairs wonderfully with an overall patio and outdoor living area design that maximizes both shade and visual appeal.