A kitchen island isn’t a luxury anymore, it’s one of the smartest upgrades a homeowner can tackle themselves. Whether you’re working with a galley kitchen or an open floor plan, a DIY kitchen island adds prep space, storage, and genuine functionality without the contractor markup. The beauty of building your own island is that you control the budget, timeline, and design. From rolling carts that slide away when needed to full-blown carpentry projects, there are kitchen island ideas DIY that fit every skill level and wallet. This guide walks through seven practical approaches, each tested by DIYers who’ve already transformed their kitchens.
Table of Contents
ToggleKey Takeaways
- DIY kitchen island ideas range from affordable rolling carts ($80–$300) to custom-built structures, allowing homeowners to add prep space and storage without contractor costs.
- Rolling carts and mobile islands are ideal for renters and those testing whether an island works in their space, with the flexibility to move them anywhere in the kitchen.
- Repurposed furniture like dressers and vintage cabinets can transform into functional islands with minimal modification, requiring only a food-safe countertop upgrade and proper base reinforcement.
- Building a DIY kitchen island from scratch using 2×4 lumber and butcher block or reclaimed wood takes roughly a weekend and costs $300–$1,200 depending on materials and complexity.
- Functional upgrades like bar seating (24–26 inches tall), open storage, and electrical outlets turn a basic island into an indispensable gathering spot that requires proper spacing of at least 42 inches clearance.
- Careful planning—measuring twice, ensuring wood is sealed, and skipping complex plumbing installations—makes DIY kitchen island projects achievable for homeowners of any skill level.
Rolling Carts and Mobile Islands
Start here if you’re renting, hesitant about permanent changes, or just want to test whether an island actually works in your space. A rolling cart, often called a kitchen island cart or utility cart, gives you flexibility without any installation. Look for metal-frame carts with wood or stainless-steel tops, typically 24–36 inches wide. These cost between $80–$300 depending on material and capacity. The advantage is obvious: you can move it to different zones, tuck it into a corner when you need floor space, or even roll it into the dining room during parties.
If you want something more custom, build a mobile base yourself. Take a simple wooden box frame (2×4 studs work fine), add an open shelf or two for storage, cap it with butcher block or plywood edged with trim, then mount four heavy-duty locking casters underneath (at least 3-inch wheels rated for 75+ pounds each). The wheels should swivel and have brakes so the cart doesn’t roll when you’re chopping. This DIY approach costs roughly $150–$250 and gives you exactly the height and width you want. Make sure the cart is no taller than your counters, usually 36 inches finished height, so it feels integrated, not like a standalone cart parked in the middle of your kitchen.
Repurposed Furniture Islands
An old dresser, buffet, or cabinet can become an island with minimal modification. The beauty here is that reclaimed pieces already have character, solid construction, and honest joinery that new particle-board options don’t. Scour Facebook Marketplace, estate sales, or your own attic.
Converting Dressers and Vintage Cabinets
Start with a piece that’s structurally sound, check that drawers slide smoothly and the frame isn’t warped or cracked. Remove or reinforce the back panel if there is one: most islands need to be accessible from both sides. Sand the entire piece and finish it to match your kitchen. If you’re using a dresser, remove the legs and add a base of 2×4 studs bolted underneath to raise it to counter height (36 inches). Add adjustable feet or a proper frame so it sits level.
The top is the critical part. A marble slab, butcher block, or thick quartz countertop mounted firmly will handle prep work and weight. Most antique furniture has a top surface that’s beautiful but not food-safe: replacing it upgrades functionality instantly. Butcher block or sealed wood adds warmth and costs $100–$400 depending on material grade and size. If the piece has gaps or unfinished undersides that face into the room, add a simple skirt of 1×12 lumber around the perimeter for a polished look. Bolt the new top securely, you don’t want it shifting when someone leans on it. This approach typically runs $200–$600 total and transforms a forgotten piece into kitchen-ready storage that tells a story.
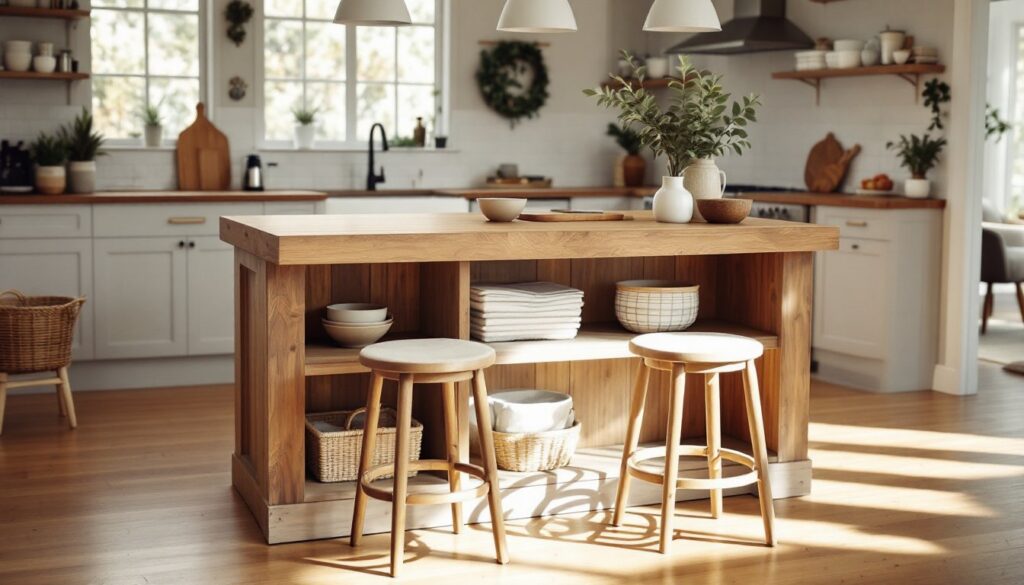
Build-Your-Own Island From Scratch
For those ready to commit, building from the ground up gives you total control over size, shape, height, and features. This isn’t complicated carpentry, but it does require accurate measuring, basic tool skills, and a level work surface.
Simple Base Structure and Countertop Options
Start with a base frame of 2×4 lumber, securely fastened with 2.5-inch wood screws or bolts. Standard counter height is 36 inches (plus countertop thickness), but if you use your island primarily for prep while sitting on stools, 34 inches feels better. Frame out the footprint you want, say, 3 feet by 5 feet, and add interior supports every 16 inches. This keeps the structure rigid and prevents sag under load.
Add an open shelf or two at 12 inches on center using 3/4-inch plywood shelves on support cleats. This gives storage without making the island feel bulky. For the countertop, you have three solid choices: solid-wood butcher block (warm, forgiving, requires sealing and mineral-oil maintenance), plywood topped with tile or stainless steel (durable, budget-friendly, professional feel), or reclaimed wood salvaged from pallets or barn siding (character-rich, needs finishing and careful inspection for nails).
Fasten the top securely with pocket-hole screws driven up through the frame into the underside of the countertop, this hides fasteners and allows seasonal wood movement. A 1×10 or 1×12 toe-kick board around the base (recessed 3–4 inches) keeps feet comfortable when standing and gives a finished edge. This DIY island runs roughly $300–$600 in materials and takes a weekend if you’ve got basic carpentry experience. Free plans are available online: Ana-White offers accessible kitchen island plans that DIYers consistently recommend.
Butcher Block and Reclaimed Wood Islands
Butcher block and reclaimed wood deserve their own spotlight because they’re the go-to choice for DIYers who want warmth and authenticity in their kitchen. Butcher block is edge-grain wood (traditionally maple, walnut, or oak) glued and pressed into solid slabs, then sanded smooth. It’s beautiful straight out of the box, naturally food-safe when sealed, and incredibly forgiving, small dings and cuts add character rather than screaming “damage.”
If you’re sourcing reclaimed wood, be methodical. Inspect for hidden nails (a metal detector costs $20–$40 and saves you from a ruined saw blade), check moisture content with a wood-moisture meter to avoid cupping or warping, and understand the wood’s origin, pressure-treated lumber or railroad ties should never be food surfaces due to chemical treatments. Authentic barn wood, old flooring, or furniture salvage works beautifully.
Both options require finishing. Butcher block typically ships unfinished: you’ll need to sand it smooth (80–120 grit), then seal it with food-grade mineral oil, beeswax paste, or a water-based polyurethane. Reapply mineral oil every few weeks: polyurethane lasts longer but feels less “wooden.” Reclaimed wood often arrives with a patina and weathered look, decide whether to sand and stain it or embrace the age. Once sealed, it’s as durable as butcher block. The investment runs $400–$1,200 depending on slab size and thickness, but you’re paying for genuinely lasting material and visual impact that melts into a warm kitchen aesthetic.
Functional Features to Add to Your Island
Once you’ve got a solid base and top, functional upgrades take your island from “nice to have” to “couldn’t live without it.” Start with open or closed storage. Shelves cost almost nothing and keep cookbooks, serving bowls, or baskets in reach. Closed cabinets hide mess and keep dust off small appliances. Frame them using pocket-hole construction (a Kreg jig simplifies this for $30–$80) so joints are clean and invisible.
Seating is huge. Two to four bar stools tucked under a 3–4 inch overhang create a secondary dining zone. Make sure stools are 24–26 inches tall for a standard 36-inch counter: measure your specific setup. Check that there’s at least 12 inches of knee clearance between the stool seat and the underside of the overhang, nobody wants splinters on their thighs.
Electrical outlets and USB chargers transform an island into a charging station and workspace. This requires running wiring through the floor or wall (usually a job for a licensed electrician in most jurisdictions: check local code). Alternatively, mount a power strip on the side of the island for a non-permanent solution, less elegant, but practical and renter-friendly.
A sink or cooktop escalates complexity and typically requires professional plumbing or gas installation, permits, and inspections. If you’re considering this, consult a plumber first: costs and feasibility vary wildly by location and existing utility lines. Most DIY islands skip this and use the space for prep and storage instead, which is honest work and genuinely useful. If you want a built-in cutting board, tile insert, or beverage cooler, these are achievable upgrades that don’t require permits but do require precise cutouts and fastening. Instructables has detailed tutorials for custom island upgrades that walk through measurements and assembly step-by-step.
Getting Started With Your DIY Kitchen Island
The path from “I wish we had an island” to “I built our kitchen island” is shorter than you think. Start with your space: measure the footprint, confirm you won’t block traffic flow, and make sure there’s at least 42 inches of clearance on all sides for comfortable movement. Pick a style that matches your kitchen and your comfort level, rolling carts and repurposed furniture require minimal tools and zero permits: built islands demand basic carpentry but reward you with custom-fit functionality. Gather inspiration from Kitchen Inspiration Ideas: Transform Your Space and similar resources to finalize your vision. Most DIYers find their island becomes the actual gathering spot in the home, not just a kitchen addition. Take time with prep work, measure twice, and don’t skip sealing wood or leveling the base. Your future self will thank you every time you’ve got extra counter space or an extra seat at dinner.